| Capacity | — |
| Framing Lumber | — |
| Siding Area | — |
| Run Wire Mesh | — |
| Roofing Area | — |
| Total Material Cost | — |
|---|
Chicken Coop 3D Builder

Building a secure and spacious environment for poultry requires accurate planning. Guessing dimensions or estimating lumber often leads to wasted materials and inadequate housing. The Chicken Coop 3D Builder eliminates guesswork by providing a precise mathematical and visual environment for designing backyard farm structures. This guide explains how to utilize every feature within the builder to plan an optimal structure.


Table of Contents
Navigating the Interface and Core Features
The builder operates through a straightforward input system. Modifying any parameter instantly updates the visual model and the material estimates. The application relies on standard construction logic, ensuring that the generated models reflect real-world building practices.
📊 The unit system toggle switches the entire workspace between Imperial feet and inches or Metric meters. Selecting the appropriate system before adjusting sliders ensures accurate baseline measurements. The sliders allow for fine-tuning dimensions with precise increments, ensuring that the final blueprint matches available yard space exactly.
Foundation Selection: Ground, Blocks, and Stilts
A solid foundation dictates the longevity of the entire build. The calculator offers three primary base configurations.
On Ground: This option places the base frame directly against the earth. It requires treated lumber to prevent rot. Ground-level builds benefit from natural earth insulation during winter months but may be susceptible to heavy rainfall and drainage issues.
Blocks: Setting the structure on concrete cinder blocks elevates the wood away from soil moisture. This method provides excellent airflow underneath the floorboards, preventing fungal growth and extending the life of the joists.
Stilts: Elevating the entire main housing unit creates a multi-functional space. The area underneath becomes shaded real estate for the flock during hot summer days. It also places the main access doors at an ergonomic height for cleaning and egg collection.
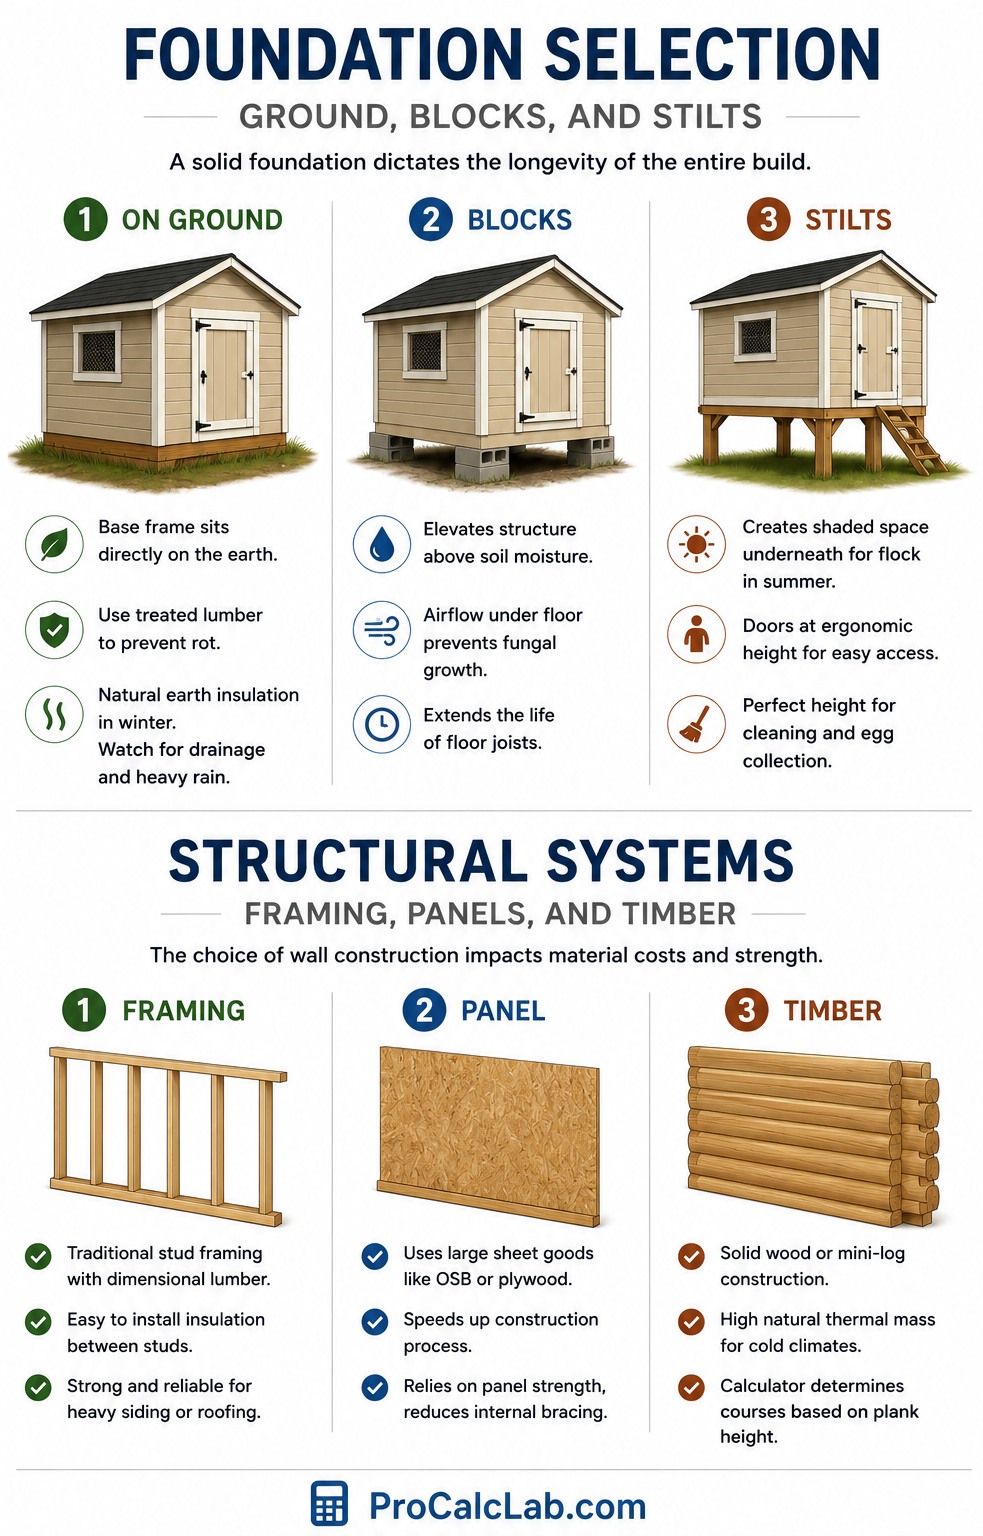
Structural Systems: Framing, Panels, and Timber
The choice of wall construction impacts material costs and structural strength.
Framing: Traditional stud framing utilizes standard dimensional lumber. This is the most common method in North America. It allows for easy installation of insulation between the studs and provides a robust skeleton for heavy siding or roofing materials.
Panel: The panel option assumes the use of large sheet goods like OSB or plywood to form the primary structure. This method speeds up the building process significantly and minimizes the need for complex internal bracing, relying instead on the shear strength of the panels.
Timber: Timber or mini-log construction stacks solid wood horizontally. This creates incredibly strong walls with high natural thermal mass, ideal for extremely cold climates. The builder calculates the number of courses required based on the selected plank height.
Roof Styles and Weather Management
Roof design must account for local weather patterns, specifically snow load and rainfall.
Shed Roof: A single continuous slope. This is the simplest roof to frame and requires the least amount of material. Orienting the high side toward the sun allows for tall windows, maximizing winter light penetration.
Gable Roof: Two sloping sides that meet at a central ridge. Gable roofs shed rain and heavy snow efficiently. They also provide extra overhead space inside, which improves ventilation and allows hot air to escape above the roosting bars.
Flat Roof: While visually modern, flat roofs require heavy waterproofing membranes and careful sloping to prevent standing water. They are best suited for arid climates with minimal precipitation.
Space Requirements and Capacity Planning
Overcrowding leads to stress, disease, and behavioral issues within a flock. The builder calculates capacity based on the interior square footage. Different breeds require different amounts of floor space.
Flock Space Guidelines
The table below outlines the minimum recommended space per bird for various common breeds. These numbers represent the bare minimum; providing more space always results in a healthier flock.
| Poultry Breed or Type | Inside Space per Bird sq ft | Outdoor Run Space per Bird sq ft |
|---|---|---|
| Bantam Breeds Miniature | 2 | 8 |
| Leghorn Active Layer | 3 | 10 |
| Rhode Island Red Dual Purpose | 4 | 10 |
| Plymouth Rock Heavy Layer | 4 | 10 |
| Sussex Dual Purpose | 4 | 10 |
| Australorp Heavy Breed | 4 | 10 |
| Wyandotte Cold Hardy | 4 | 10 |
| Orpington Large Fluffy | 4.5 | 12 |
| Brahma Extra Large | 5 | 14 |
| Jersey Giant Massive | 6 | 15 |
| Meat Birds Broilers | 2.5 | 5 |
| Silkie Ornamental | 3 | 8 |
| Ameraucana Blue Egg Layer | 4 | 10 |
| Faverolles Feathered Feet | 4.5 | 12 |
| Cochin Heavy Feathered | 5 | 12 |
Mathematical Formulas Used in Construction
The tool processes several structural equations to generate material lists. Understanding these basic formulas helps in verifying estimates and purchasing the correct amount of lumber.
Floor Area:
A = W × D
Where A is Area, W is Width, and D is Depth.
Internal Volume:
V = A × H
Where V is Volume, A is Area, and H is Height. Volume is critical for calculating necessary ventilation rates.
Wall Surface Area for Siding:
Swalls = 2 × W × H + 2 × D × H
This formula finds the total exterior surface area before subtracting door and window cutouts.
Capacity Calculation:
C = A / Rbird
Where C is Capacity, A is Area, and Rbird is the required space per bird.
Step-by-Step Imperial Calculation Example
Applying the calculator to a real-world scenario demonstrates its utility. Consider a plan for a medium-sized flock using standard dimensional lumber.
Input Parameters:
- Unit System: Imperial
- Base Type: Stilts
- Construction: Framing
- Roof Type: Shed
- Width: 6.0 ft
- Depth: 8.0 ft
- Height: 6.0 ft
- Run Length: 10.0 ft
- Nesting Boxes: 4
- Stud Width: 0.3 ft approx 3.5 inches for a 2×4
- Price per unit: 15.00 dollars per cubic foot of premium lumber
Step 1: Floor Area and Capacity
Multiply the width 6.0 by the depth 8.0. The result is 48.0 square feet of interior floor space. Assuming a standard requirement of 4.0 square feet per heavy breed hen, the structure safely houses 12 birds.
Step 2: Total Wall Area
Calculate the perimeter: 6.0 plus 8.0 plus 6.0 plus 8.0 equals 28.0 linear feet. Multiply the perimeter by the height 6.0 to get 168.0 square feet of gross wall area. This number dictates how many sheets of exterior siding are required.
Step 3: Run Area and Wire Mesh
The run extends out from the main structure. With a width of 6.0 ft and a run length of 10.0 ft, the ground footprint of the run is 60.0 square feet. Calculating the wire mesh requires adding the side walls of the run and the top covering. If the run walls are 6.0 ft tall, the two long sides equal 120.0 sq ft, the end cap equals 36.0 sq ft, and the top equals 60.0 sq ft. The total hardware cloth needed is approximately 216.0 square feet.
Step 4: Framing Lumber Volume
The builder calculates the total linear footage of 2×4 studs required for the floor joists, wall plates, vertical studs spaced 16 inches on center, and roof rafters. If the total framing equals 350 linear feet of 2×4 material, the volume in cubic feet is calculated. A 2×4 is actually 1.5 inches by 3.5 inches. Area in square inches is 5.25. Divided by 144 equals 0.0364 square feet. Multiply by 350 linear feet to get 12.74 cubic feet of solid wood.
Step 5: Estimated Cost
Multiply the solid wood volume 12.74 by the price per cubic foot 15.00. The estimated framing cost is 191.10 dollars. Siding, roofing, and hardware are calculated similarly based on their respective unit prices.
Material Sizing and Selection Guide
Selecting the right materials prevents structural sagging and predator break-ins. The table below details common materials used in poultry architecture and their ideal applications.
| Material Category | Standard Dimension or Gauge | Primary Application |
|---|---|---|
| Framing Lumber | 2×4 Nominal 1.5 x 3.5 Actual | Wall studs, roof rafters, light joists |
| Heavy Framing | 2×6 Nominal 1.5 x 5.5 Actual | Floor joists, long span roof rafters |
| Ground Contact Timber | 4×4 Pressure Treated | Corner posts, skids, stilt legs |
| Exterior Sheathing | 1/2 inch CDX Plywood | Wall panels, roof decking |
| Economy Sheathing | 7/16 inch OSB | Interior walls, temporary structures |
| Flooring Panel | 3/4 inch Advantech or Marine Ply | Subfloor requiring high moisture resistance |
| Predator Mesh | 1/2 inch Hardware Cloth 19 gauge | Windows, vents, entire outdoor run |
| Economy Mesh | Chicken Wire Hexagonal | Keeping chickens out of gardens strictly non-predator |
| Roofing Material | Corrugated Steel Panels | Durable weatherproofing, sheds snow easily |
| Insulation Board | 1.5 inch Rigid Foam XPS | Between studs in cold weather zones |
| Fasteners | 3 inch Exterior Deck Screws | Assembling all structural framing |
| Hardware | Heavy Duty Gate Hinges | Main access doors, nesting box lids |
Optimizing the Augmented Reality Feature
The Virtual Placement button activates the AR capability on supported mobile devices. This completely changes how site selection is handled. Instead of driving stakes into the ground and running string lines, the user points their phone camera at the backyard. The 3D model appears overlaid on the physical environment at true 1:1 scale. This allows the builder to physically walk around the virtual structure.
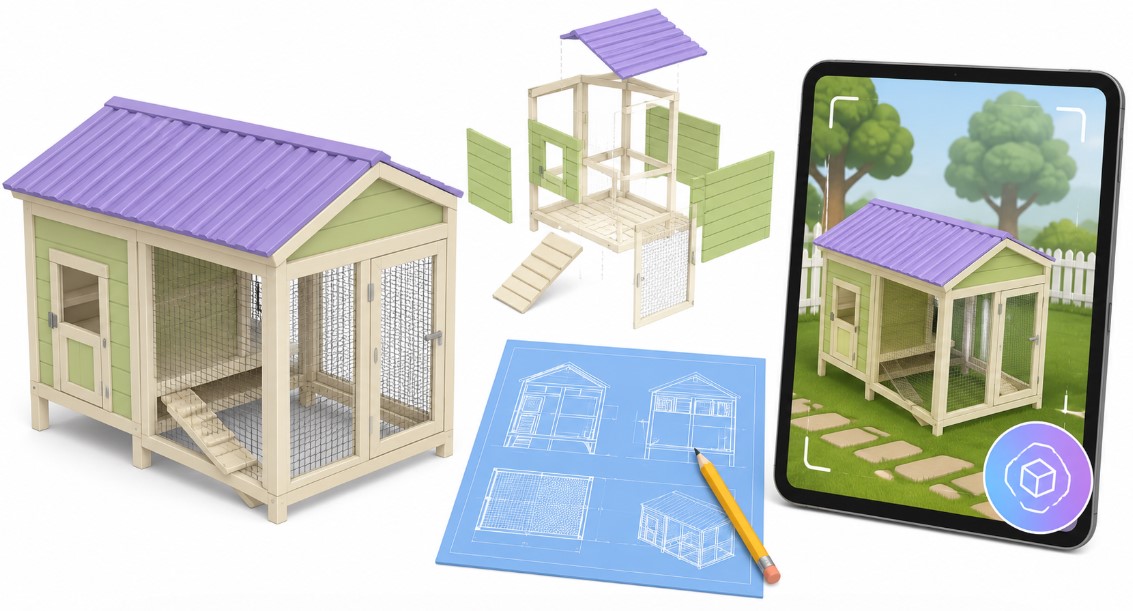
Walking around the AR model reveals line-of-sight issues from the house. It shows exactly where the morning sun will hit the windows and whether existing tree branches will interfere with the roofline. If the digital model looks too imposing or too small in the chosen location, the dimensions in the builder can be adjusted instantly before a single piece of wood is cut.
Ventilation vs Drafts: The Airflow Balance
❄ Proper airflow removes moisture and ammonia buildup. However, a common mistake is creating drafts at roosting height, which leads to frostbite in winter.
Ventilation should be placed high on the walls, near the roofline. Hot, moist air naturally rises and escapes through these upper vents. The calculator’s height parameter directly influences how high above the roosting bars these vents can be placed. A taller structure allows for massive upper ventilation without creating chilling winds across the sleeping flock.
Nesting Box Configurations
🧱 Nesting boxes are for egg-laying only, not for sleeping. The general rule is one box for every three to four hens. If the flock capacity shows 12 birds, setting the nest slider to 3 or 4 is optimal.
Mounting boxes on the exterior of the main walls saves internal floor space and allows for external egg collection. The builder accounts for the extra materials required to frame and roof external nesting appendages.
Reference Literature for Poultry Architecture
For further reading on advanced structural techniques and flock management, the following resources provide deep industry knowledge.
- Storey’s Guide to Raising Chickens by Gail Damerow. Comprehensive manual on behavior space requirements and health.
- Reinventing the Chicken Coop by Kevin McElroy and Matthew Kessler. Focuses on modern architectural designs and material optimization.
- Building Chicken Coops for Dummies by Todd Brock and Dave Zook. Entry-level carpentry fundamentals for agricultural outbuildings.
- The Small-Scale Poultry Flock by Harvey Ussery. In-depth look at natural systems and integrating housing with pasture management.
- Woodworking for the Garden by Alan and Gill Bridgewater. Techniques for creating weather-resistant outdoor timber joints.

Markus Fletcher — Structural Design Specialist
Expert in structural integrity, 3D modeling, and applied mathematics. Markus focuses on creating precise tools for construction professionals and DIY engineers.


