
| Sauna Volume | — |
| Stove Power | — |
| Lining Area | — |
| Bench Boards | — |
| Roof Area | — |
| Total Materials | — |
|---|
Planning a custom sauna requires more than just a rough sketch on a notepad. Traditional building methods often lead to purchased excess materials, undersized heaters, and cramped bench layouts. The digital approach changes everything. Using a 3D Sauna Builder with Schematics and AR Visualization allows builders, contractors, and DIY enthusiasts to calculate every square inch before buying a single piece of lumber. This guide breaks down exactly how to navigate the tool, understand the underlying math, select the right materials, and construct a highly efficient hot room without the guesswork.


Table of Contents
Navigating the Configuration Interface
The layout of the builder is designed to mirror the actual sequence of construction. Every choice impacts the final volume and structural requirements. Here is a detailed look at the available options and what they mean for the build process.
Unit System Selection
The primary setting dictates the measurement framework. Switching to the Imperial system instantly configures the sliders to display feet and inches. This matches standard North American lumber dimensions. Working in feet and inches prevents conversion errors at the lumber yard, ensuring that buying a two-by-four actually aligns with the cut sheet.
Wall Construction Types
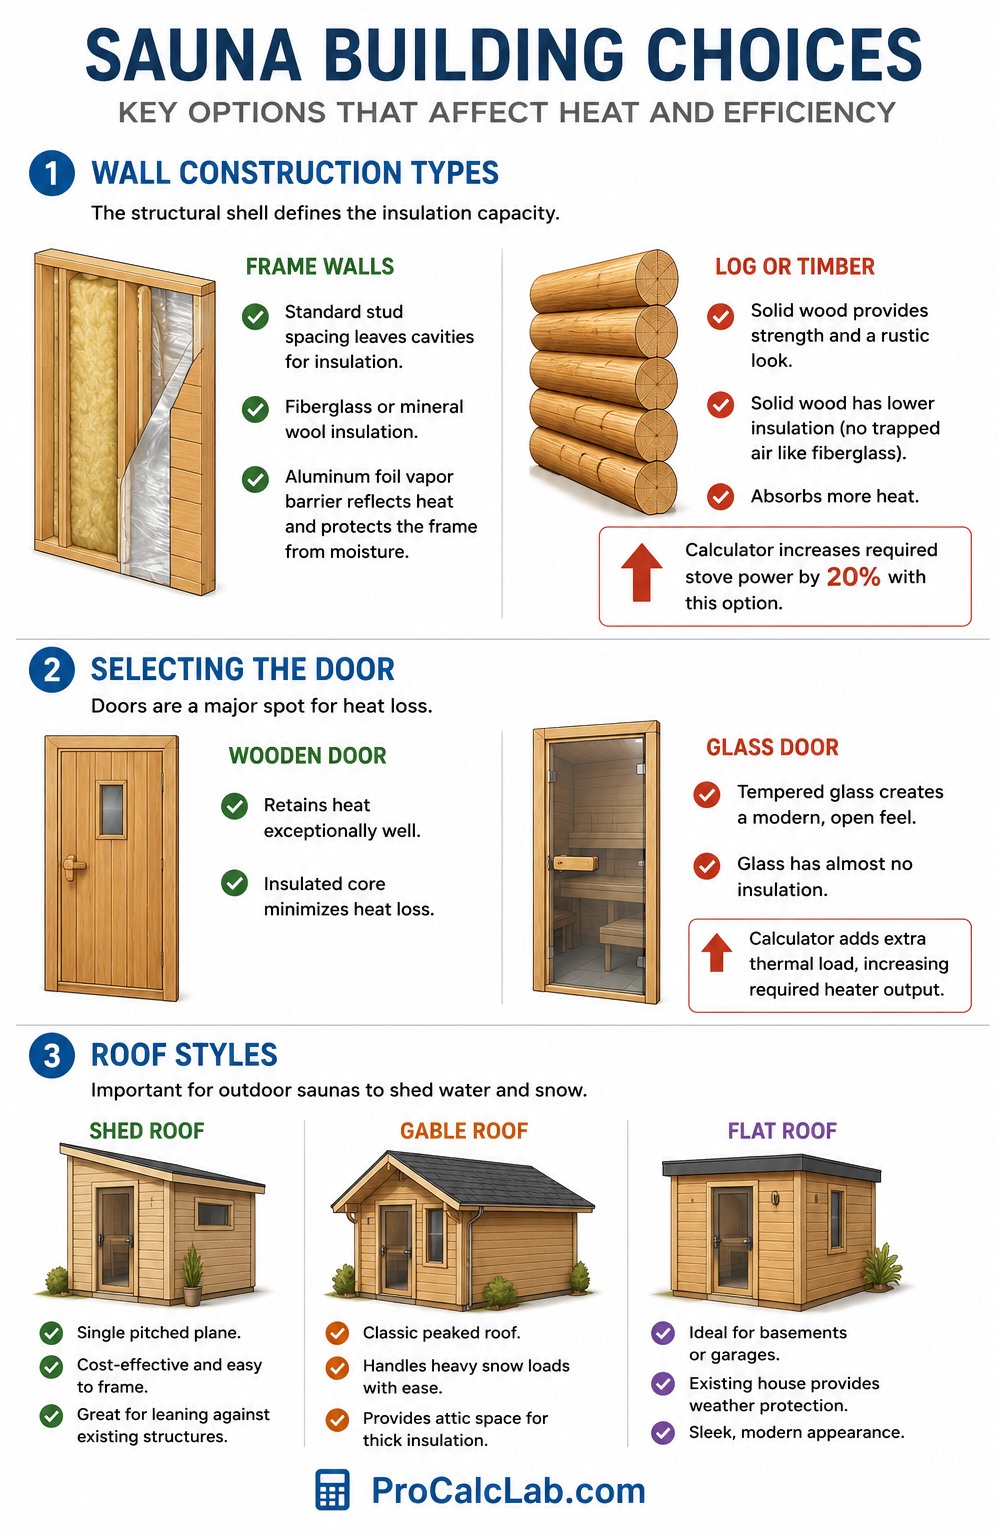
The structural shell defines the insulation capacity. The builder offers two primary choices.
- Frame Walls: This is the standard choice for indoor saunas and most backyard builds. A stick-built frame utilizes standard stud spacing, leaving cavities for fiberglass or mineral wool insulation. An aluminum foil vapor barrier is stapled over the studs to reflect radiant heat back into the room and protect the frame from moisture.
- Log or Timber: Solid wood walls provide structural integrity and a rustic aesthetic. However, solid wood lacks the high R-value of trapped air found in fiberglass insulation. Timber absorbs a massive amount of heat before the room reaches target temperatures. The calculator automatically adjusts the required stove power upwards by twenty percent when this option is active.
Selecting the Door
Doors are notorious spots for heat loss. The interface allows toggling between a traditional wooden door and a modern glass door.
- Wooden Door: A wooden door with a small viewing window retains heat exceptionally well. It is built with insulation inside its core.
- Glass Door: Tempered glass doors are standard in modern design. They make small spaces feel open and luxurious. Because glass offers virtually zero insulation value, the calculator factors in extra thermal mass, bumping up the required heater output.
Roof Styles
For outdoor installations, shedding water and snow is critical.
- Shed Roof: A single pitched plane. It is highly cost-effective and easy to frame. Perfect for leaning against an existing structure or keeping a low profile near fence lines.
- Gable Roof: The classic peaked roof. It handles heavy snow loads effortlessly and provides overhead space that can be packed with thick batts of insulation.
- Flat Roof: Typically chosen when building inside a home basement or garage where the existing house provides the weatherproofing.
The Math Behind the Sauna
Proper heating requires precise volume calculations. An underpowered stove leads to a lukewarm room, while an overpowered stove cycles off too quickly, leaving the rocks cold and unable to produce steam. The tool handles the complex math automatically, but understanding the formulas provides a deeper appreciation for the physics of the room.
To find the base cubic volume, the width, depth, and height are multiplied together.
Vbase = W × L × H
If a glass door is selected, the thermal loss must be compensated for. A common industry rule is to add additional equivalent volume to account for the uninsulated surface. The formula reflects this adjustment by adding an extra heat requirement factor.
Preq = Vbase + Gloss
For estimating the interior wall cladding, the surface area of the walls and ceiling must be found, while subtracting the empty space taken up by the door.
Awalls = W + L × 2 × H
Aceiling = W × L
Atotal = Awalls + Aceiling − Adoor
Material Selection and Heat Dynamics
The environment inside a hot room swings from ambient backyard temperatures to over two hundred degrees Fahrenheit in a matter of minutes. Materials must endure this expansion and contraction without warping, splintering, or releasing toxic sap.
Comprehensive Wood Species Comparison
The interior paneling, known as cladding, dictates the aroma, comfort, and longevity of the room. Softwoods are preferred because they do not absorb heat the way dense hardwoods do. Sitting on a dense piece of oak at two hundred degrees would cause severe burns, whereas soft cedar remains comfortable to the touch.
| Wood Species | Heat Retention Profile | Moisture Resistance |
|---|---|---|
| Western Red Cedar | Remains cool to the touch | Highly resistant to rot and decay |
| Eastern White Cedar | Low heat absorption | Excellent natural resistance |
| Clear Hemlock | Very low density stays cool | Moderate requires good ventilation |
| Nordic Spruce | Absorbs slightly more heat | Good but contains small tight knots |
| Aspen | Extremely comfortable for seating | Does not splinter easily under stress |
| Alder | Stays moderately cool | High resistance to warping |
| Basswood | Soft and cool against bare skin | Average needs proper drying out |
| Thermo-Ash | Warm but manageable | Thermally modified for extreme stability |
| Thermo-Pine | Very stable heat profile | High resistance due to baking process |
| Douglas Fir | Too hot for interior seating | Excellent for hidden structural framing |
| Yellow Pine | Heats up quickly | Poor choice due to heavy sap seeping |
| Poplar | Affordable but runs warm | Requires heavy treatment against rot |
| Mahogany | Will burn bare skin instantly | Heavy and dense not recommended |
Heater Technology
The heart of the build is the stove. The 3D builder offers a toggle between electric and wood-burning options, heavily influencing the total cost and structural footprint. Electric units need dedicated circuits, while wood-burning units demand complex chimney routing and fireproof shielding.
| Heater Mechanism | Typical Heat Up Time | Best Use Case Scenario |
|---|---|---|
| Standard Wall Mounted Electric | Thirty to forty five minutes | Small indoor rooms and tight spaces |
| Floor Standing Electric Tower | Forty five to sixty minutes | Lovers of soft steam and large rock mass |
| Wood Fired with Chimney | Sixty to ninety minutes | Off grid cabins and traditionalists |
| Infrared Carbon Panels | Fifteen to twenty minutes | Mild heat therapy without harsh steam |
| Commercial Gas Heater | Thirty minutes | Large public facilities requiring constant heat |
A Detailed Example Build
To fully grasp the utility of the calculator, let us walk through a hypothetical backyard build using standard American imperial measurements. A homeowner wishes to build a freestanding unit capable of seating four adults comfortably.
📊 The dimensions are entered into the sliders as follows. The width is set to 8 feet. The depth is set to 6 feet. The ceiling height is set to 7 feet. A seven foot ceiling is standard practice. Anything higher simply traps valuable heat far above the bathers heads, wasting energy and requiring a massive heater.
- First, the tool calculates the raw interior volume. Eight feet multiplied by six feet multiplied by seven feet yields 336 cubic feet. Because the homeowner selected a glass door, the tool automatically adjusts the required heating power. Generally, a kilowatt of power is needed for every 45 to 50 cubic feet. The tool recommends an 8 kilowatt electric stove to ensure rapid heating even during cold winter months.
- Next, the material surfaces are measured. The perimeter is 28 linear feet. Multiplying this by the seven foot height gives 196 square feet for the walls. The ceiling adds exactly 48 square feet. After subtracting a standard 3 foot by 6.5 foot door, the required interior cladding area comes out to roughly 224 square feet. Because installing tongue and groove boards requires cutting and fitting, builders always buy extra. The builder tool factors this into the final price estimation.
- The bench layout is critical. The slider is set to two tiers. Benches typically run along the longest wall, which is eight feet in this scenario. A proper upper bench is 24 inches wide, requiring about six standard boards running the length of the room. The lower bench acts as a step and is slightly narrower. The tool outputs the total linear feet of specialized bench wood needed, allowing the user to order exactly what is required without paying for expensive excess lumber.
- Finally, the roof calculation checks the shed roof selection. It takes the footprint, adds overhangs to shed rain away from the walls, and determines the square footage of roofing membrane or metal panels required.
Best Practices for Structural Longevity
Building a hot room is akin to building an inverted refrigerator. Instead of keeping the cold in, the goal is to trap extreme heat and moisture without allowing it to rot the structural framing of the house or cabin.
- Insulation must be meticulously installed. R-13 fiberglass batts are standard for two-by-four walls, while R-19 batts fit perfectly into the ceiling joists. The ceiling takes the brunt of the heat blast, making overhead insulation the most critical step of the entire framing process.
- The vapor barrier is non-negotiable. Standard plastic sheeting will melt and release toxic fumes. Builders strictly use pure aluminum foil. This foil is stapled directly to the inside edges of the studs over the insulation. Every seam, staple hole, and corner must be sealed with high-temperature aluminum foil tape. This creates a completely hermetic seal, preventing steam from passing into the cold wall cavities where it would condense and form dangerous black mold.
- Between the foil barrier and the interior wooden cladding, a small air gap must be maintained. Horizontal furring strips, usually half an inch thick, are nailed over the foil. The tongue and groove cedar is then nailed to these strips. This air gap allows the backside of the wood to dry out completely between sessions, extending the life of the wood by decades.
Ventilation Strategies
A sealed room with a roaring fire or blazing heating elements quickly depletes oxygen. Bathers will feel fatigued rather than refreshed if fresh air is not continuously cycled. Proper ventilation relies on natural convection currents.
🌡 The intake vent is always placed down low, directly under or directly behind the heater. As the heater operates, it acts like a vacuum, pulling fresh, cold air from the outside into the room. This cold air hits the hot rocks, immediately warms up, and rises to the ceiling.
The exhaust vent is positioned on the opposite wall, as far away from the intake as possible. It is generally placed about two feet below the ceiling, often tucked just under the upper seating bench. This placement forces the hot air to travel across the room, bathing the occupants in heat before the cooler, stale air is pushed out the exhaust. Leaving the exhaust vent wide open after a session clears out remaining moisture.
Using the Augmented Reality Feature
Reading schematics is helpful, but visualizing a structure in its final location prevents costly landscaping mistakes. The AR View button accesses the device camera.
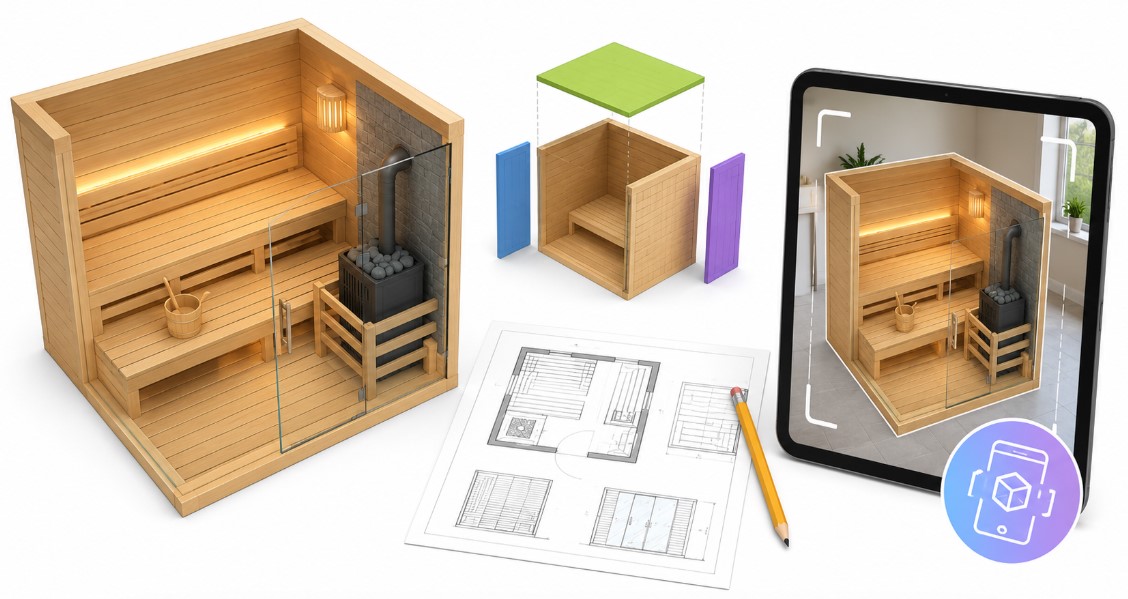
When activated, the three dimensional model is superimposed onto the live camera feed. This allows the builder to walk into the backyard, point the phone at an empty patch of grass, and see exactly how the eight-by-six foot structure will look. It helps determine if the shed roof will block a window, or if the door has enough clearance to swing open without hitting a fence. Real time spatial awareness bridges the gap between digital planning and physical construction.
Reference Literature and Building Codes
While the digital tool handles the heavy lifting of material calculations and spatial layout, consulting formal literature ensures compliance with local building regulations and advanced carpentry techniques.
- The Art of Sauna Building by C. Roy
- Residential Building Codes for Accessory Structures
- The Thermal Guide to Banya and Sauna Engineering
- Principles of Vapor Barriers and Moisture Control in Extreme Environments
- National Electrical Code Guidelines for Wet Location Heaters
- Timber Framing Fundamentals for High Heat Applications

Markus Fletcher — Structural Design Specialist
Expert in structural integrity, 3D modeling, and applied mathematics. Markus focuses on creating precise tools for construction professionals and DIY engineers.


