
Replacing an outdoor shade canopy or constructing a custom textile structure from scratch demands precise mathematical planning. Guessing fabric requirements leads directly to expensive material waste or short panels that ruin the entire project. Modern canvas fabrication relies on accurate digital modeling before a single cut is made on the worktable. This web-based 3D calculator completely removes the guesswork from canopy pattern drafting. By inputting three simple measurements taken directly from the physical skeleton frame, builders receive instant surface area calculations, flat panel dimensions, and a visual representation of the final shape.


The tool serves a wide variety of professionals and dedicated makers. Awning manufacturers, outdoor furniture restorers, marine canvas stitchers, and even photography studio technicians use these exact geometric principles. The interface provides a rotating 3D model to confirm visual proportions alongside a flat 2D blueprint diagram for technical reference. Users no longer need to manually plot complex trigonometric functions. The automated system handles the heavy lifting, delivering clean metrics ready for the cutting room.
Table of Contents
Navigating the Estimation Interface
The application interface is divided into several highly functional zones designed for rapid data entry. At the top of the screen, three primary shape selection tabs control the core mathematical engine. Selecting a different tab completely changes how the system interprets the structural skeleton. Below the shape selectors, the visualizer displays an interactive three-dimensional model. This model updates in real-time as the sliders move, allowing users to verify that the digital shape matches their physical project.
The control panel contains intuitive range sliders and direct number input boxes. Builders can drag the slider for quick visual adjustments or type exact integers into the boxes for absolute precision. The variables include the base radius, the vertical height, and the total number of structural panels. As these numbers change, the results table at the bottom instantly recalculates every essential formula.

A specialized two-dimensional canvas acts as a traditional workshop blueprint. This diagram strips away the 3D perspective to show flat cross-sections, complete with dashed centerlines and labeled dimensions. Finally, the download button captures all this data into a single image file. This feature allows fabricators to save the exact schematic and print a hard copy to keep next to the sewing machine during production.
Extracting Accurate Measurements from the Physical Frame
The calculator requires highly accurate input data to generate usable flat patterns. Measuring an empty umbrella frame requires specific techniques. Start by removing all old fabric from the metal or wooden ribs. Lay the completely collapsed frame on a long, flat surface. Measure the length of one single rib from the top center hub attachment point down to the extreme outer tip. This specific measurement represents the slant length, which helps verify the final output.
Next, open the framework to its fully locked, extended position. Place the structure upright. The first required input is the base radius R. To find this number, measure the straight horizontal distance from the center pole directly outward to one of the rib tips. Do not measure along the curved rib itself. The radius is strictly a horizontal line. Alternatively, measure the entire diameter straight across the bottom from one tip to the opposite tip, then divide that number exactly in half.
The second required input is the vertical height H. Stand a tape measure on the floor right next to the center pole. Measure from the horizontal plane of the rib tips straight up to the top center hub where the fabric will eventually rest. This determines the overall depth of the shade structure. A deeper canopy requires significantly more textile yardage than a shallow, flat design.
The Three Core Architectural Profiles
Shade structures fall into three distinct geometric categories. The calculator features dedicated algorithms for each specific style.
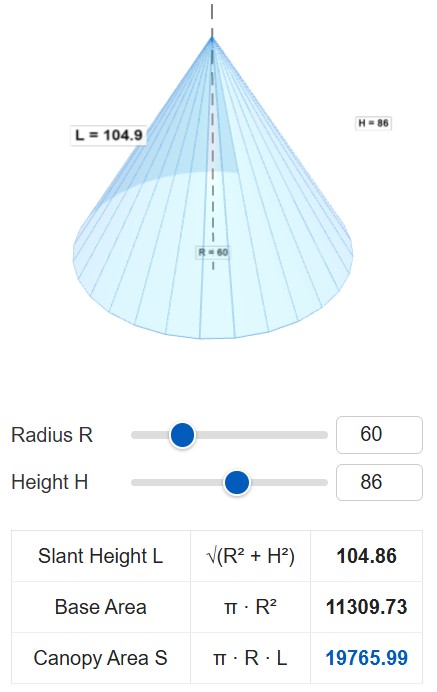
The Cone profile represents structures with perfectly circular perimeters. This mathematical model applies to frames with flexible fiberglass rings or designs featuring two dozen or more micro-ribs. Because the ribs are so close together, the fabric stretches into a smooth, continuous conical surface without flat spots. The calculations rely purely on the radius and the height to determine the total lateral surface area.
The Pyramid profile is the absolute industry standard for residential patio shades, large market umbrellas, and compact rain gear. These structures utilize thick, straight ribs that force the textile into distinct flat triangular segments. Choosing this tab activates the panel count slider. Standard market frames usually feature six or eight panels, while heavy-duty commercial designs might use ten or twelve. The engine breaks the structure down into individual flat triangles for precise pattern drafting.
The Dome profile calculates spherical caps. This shape appears in deep vintage parasols, high-wind aerodynamic rain umbrellas, and specialized parabolic lighting modifiers for photography. The skeleton features pre-curved rods that force the material into a bowl shape. Dome structures always consume substantially more raw material than a standard cone with the exact same radius and height.
Understanding the Workshop Mathematics
While the tool automates the process, understanding the underlying math prevents costly layout mistakes. The system utilizes standard geometric formulas formatted for clear workshop reference.
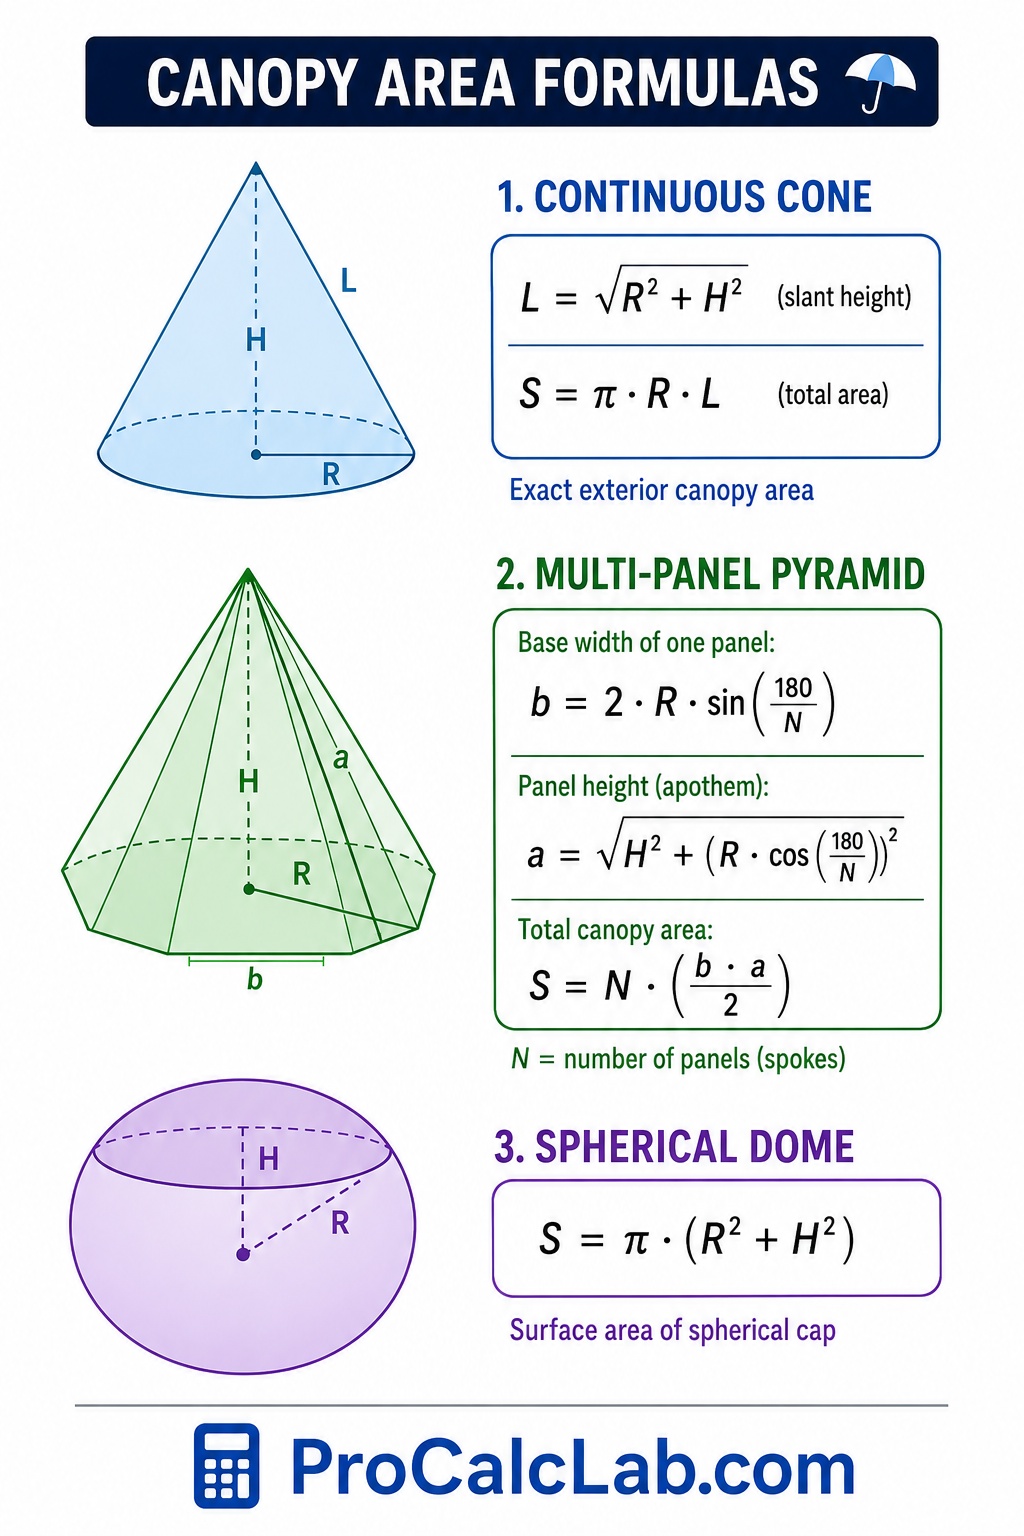
For a continuous cone shape, the calculator finds the slant height L using the Pythagorean theorem:
L = √(R2 + H2)
Once the slant height is known, the total exterior canopy area S is computed using pi:
S = π * R * L
This generates the exact square area of the finished skin.
For the multi-panel pyramid, the system focuses on one single triangular slice at a time. First, it calculates the bottom base width of one panel:
b = 2 * R * sin(180 / N)
Next, it finds the panel height, known technically as the apothem:
a = √(H2 + (R * cos(180 / N))2)
Finally, it calculates the area of that single triangle and multiplies it by the total number of panels:
S = N * (b * a / 2)
For the spherical dome, the math treats the canopy as a sliced portion of a perfect sphere. The formula for the surface area of this specific spherical cap is:
S = π * (R2 + H2)
Complete Practical Walkthrough Using Imperial Measurements
Consider a realistic workshop scenario. A maker needs to draft a replacement canopy for a heavy-duty commercial cantilever umbrella. The aluminum framework has 8 distinct straight ribs. Workshop measurements reveal a horizontal base radius R of 60 inches and a vertical center height H of 25 inches. Here is the exact workflow to determine material requirements.
- Step. Open the calculator and select the Pyramid shape tab, as the straight ribs create flat triangular panels.
- Step. Adjust the sliders to match the physical frame: set Radius R to 60, Height H to 25, and Panels N to 8.
- Step. Read the output data table. The bottom edge width of a single triangular panel b reads 45.92 inches. The vertical height of that flat panel apothem a calculates to 61.05 inches. The total calculated surface area for all 8 panels combined equals 11215.11 square inches.
- Step. Convert the square inches into standard square feet for easier material purchasing. Divide the total by 144. In this case, 11215.11 divided by 144 equals approximately 77.88 square feet of net finished area.
- Step. Factor in manufacturing waste and seam allowances. Industrial textile layout always creates scrap between the triangular cuts. Add a standard 25 percent waste multiplier to the net area. Multiply 77.88 by 1.25, resulting in 97.35 square feet. A standard 60-inch wide roll of outdoor canvas yields 15 square feet per linear yard. Divide 97.35 by 15 to get 6.49 yards. The maker should order exactly 7 linear yards of fabric to safely complete the project.

Long-Format Reference Tables for Canvas Fabrication
The following technical tables provide standard industry guidelines for dimensional planning, material allowances, and troubleshooting common fabrication errors. Use these metrics to double-check custom designs against established manufacturing norms.
| Standard Market Categories | Typical Radius in Inches | Standard Panel Count |
|---|---|---|
| Personal Rain Umbrella | 18 to 22 | 8 Panels |
| Golf Course Shelter | 30 to 34 | 8 or 10 Panels |
| Bistro Table Shade | 42 to 48 | 6 Panels |
| Standard Backyard Patio | 54 to 60 | 8 Panels |
| Commercial Cafe Model | 66 to 72 | 8 Panels |
| Resort Poolside Cantilever | 72 to 84 | 8 or 12 Panels |
| Photography Softbox Octa | 24 to 36 | 8 Panels |
| Vintage Lace Parasol | 14 to 16 | 10 Panels |
| Heavy Duty Beach Shade | 40 to 45 | 8 Panels |
| Farmers Market Stall Cover | 60 to 72 | 4 or 6 Panels |
| Structural Seam Location | Recommended Additional Allowance | Preferred Industrial Sewing Method |
|---|---|---|
| Main Vertical Panel Joins | Add 0.75 inches to both side edges | Flat-felled marine seam with double topstitch |
| Outer Perimeter Bottom Edge | Add 1.5 inches to the bottom base | Double-fold rolled hem to prevent fraying |
| Top Center Hub Opening | Add 1 inch to the top apex point | Reinforced circular collar with brass grommet |
| Rib Tip Reinforcement Pockets | Add 3 inches of separate scrap material | Triple-layered structural sleeve folded under |
| Wind Vent Overlap Tier | Add 4 inches to the lower tier top edge | Bound edge with heavy polyester webbing |
| Center Pole Tie-Down Straps | Require 18 inches of additional linear trim | Box-X stitch pattern using heavy V-92 thread |
| Decorative Perimeter Valance | Add 6 to 8 inches dropping below base | Single-fold hem with acrylic binding tape |
| Corner Stress Points | Require 4×4 inch reinforcement patches | Zig-zag heavy lockstitch on bias cut material |
| Canopy Fastening Velcro | Cut 2-inch wide strips at 6 inches long | Perimeter stitch directly onto the main seam |
| Zipper Installation for Vents | Add 0.5 inch fold-under allowance per side | Marine grade #10 YKK molded tooth zipper |
| Common Fabrication Error | Primary Cause of Failure | Corrective Workshop Action |
|---|---|---|
| Canopy sags deeply between ribs | Triangles cut off the main fabric grain | Align panel centerlines purely with roll length |
| Water leaks through vertical seams | Using standard dull sewing machine needles | Switch to sharp microtex or denim style needles |
| Seam thread degrades and breaks | Using regular cotton or basic nylon thread | Use only UV-resistant bonded V-69 polyester thread |
| Bottom perimeter edges curl upward | Hem folded too tightly causing tension | Use a dedicated bias binding tape on the raw edge |
| Rib tips punch through the fabric | Missing secondary reinforcement layers | Sew thick vinyl patches inside the corner pockets |
| Fabric rots or grows black mildew | Storing the structure while still damp | Allow 100 percent air drying before collapsing |
| Top center collar tears away | Insufficient seam allowance at the sharp apex | Leave extra material and fuse with a heated iron |
| Finished skin is completely too tight | Forgot to add seam allowances to net math | Always add 0.75 inches to the calculator outputs |
| Colors fade rapidly in direct sun | Purchased cheap printed nylon instead of acrylic | Invest in solution-dyed marine grade textiles |
| Panels stretch unevenly over time | Mixing warp and weft cuts on the layout table | Maintain strict unidirectional pattern orientation |
Material Selection and Cutting Table Organization
Calculations only matter if the underlying material can handle outdoor tension. Basic craft cotton, indoor upholstery fabric, and cheap polyester fail rapidly under heavy ultraviolet radiation and rain. Professional fabrication demands solution-dyed acrylics, marine-grade polyurethane-coated polyesters, or heavy vinyl mesh. Look for textiles rated at 600 Denier or higher. These industrial rolls generally arrive at 46 inches or 60 inches wide.
📝 When transferring the calculated flat panel dimensions to paper templates, always mark a bold centerline down the middle of the triangle. Place this centerline strictly parallel to the factory-finished long edge of the fabric roll. Woven canvas stretches aggressively on the diagonal bias. If panels are rotated arbitrarily just to save scrap material, the wind will permanently warp the finished canopy out of shape.
Arrange the triangular templates using an alternating interlocking layout. Place the narrow top point of the first panel facing up, and place the narrow top point of the second panel facing down. Maintain a minimum gap of two inches between paper templates to allow room for marking tailor chalk lines and tracing exact seam allowances. Cut the heavy canvas using professional rotary cutters or heavy 12-inch serrated tailor shears to ensure crisp, unfrayed edges before feeding the pieces into the sewing machine.
Literature
- The Sailmakers Apprentice: A Guide for the Canvas Worker — Emiliano Marino
- Marine Canvas Construction and Design — Custom Marine Canvas Training Institute
- Industrial Sewing and Textile Engineering — American Technical Publishers
- Pattern Drafting for Specialized Structures — Textile Arts Press
- Heavy Duty Sewing: Making Gear for the Outdoors — Outdoor Gear Builders
- The Complete Guide to Upholstery and Canvas Work — Technical Trades Publishing

Markus Fletcher — Structural Design Specialist
Expert in structural integrity, 3D modeling, and applied mathematics. Markus focuses on creating precise tools for construction professionals and DIY engineers.


