| Dryer temperature | 50 °C |
| Target humidity | 12 % |
| Drying time | 0 h |
| Base filament temp | 205 °C |
| Speed delta +V/5 | +0 °C |
| Nozzle delta -D*10 | -0 °C |
| Final nozzle temp | 205 °C |
Getting clean, reliable 3D prints is not just about slicing settings and a decent machine. Filament condition matters just as much. If filament has absorbed moisture, print quality can fall apart fast. Strings get worse, surfaces look rough, pops and sputters start in the nozzle, and extrusion becomes less stable. That is exactly why a drying and temperature calculator is useful. It gives a fast, simple way to check two things that affect print results more than many people expect: how dry the filament should be, and what temperature range makes sense for printing.



👉 This kind of tool is designed for everyday use. It is not trying to replace a full materials lab, and it does not need to. The goal is simpler: help users choose a practical drying target, estimate drying time, and get a sensible nozzle temperature from material type, nozzle size, and printing speed. That makes it easier to set up a print without guessing. It also makes it easier to compare materials like PLA, PETG, ABS, Nylon, and TPU without digging through endless forum posts or manufacturer charts.
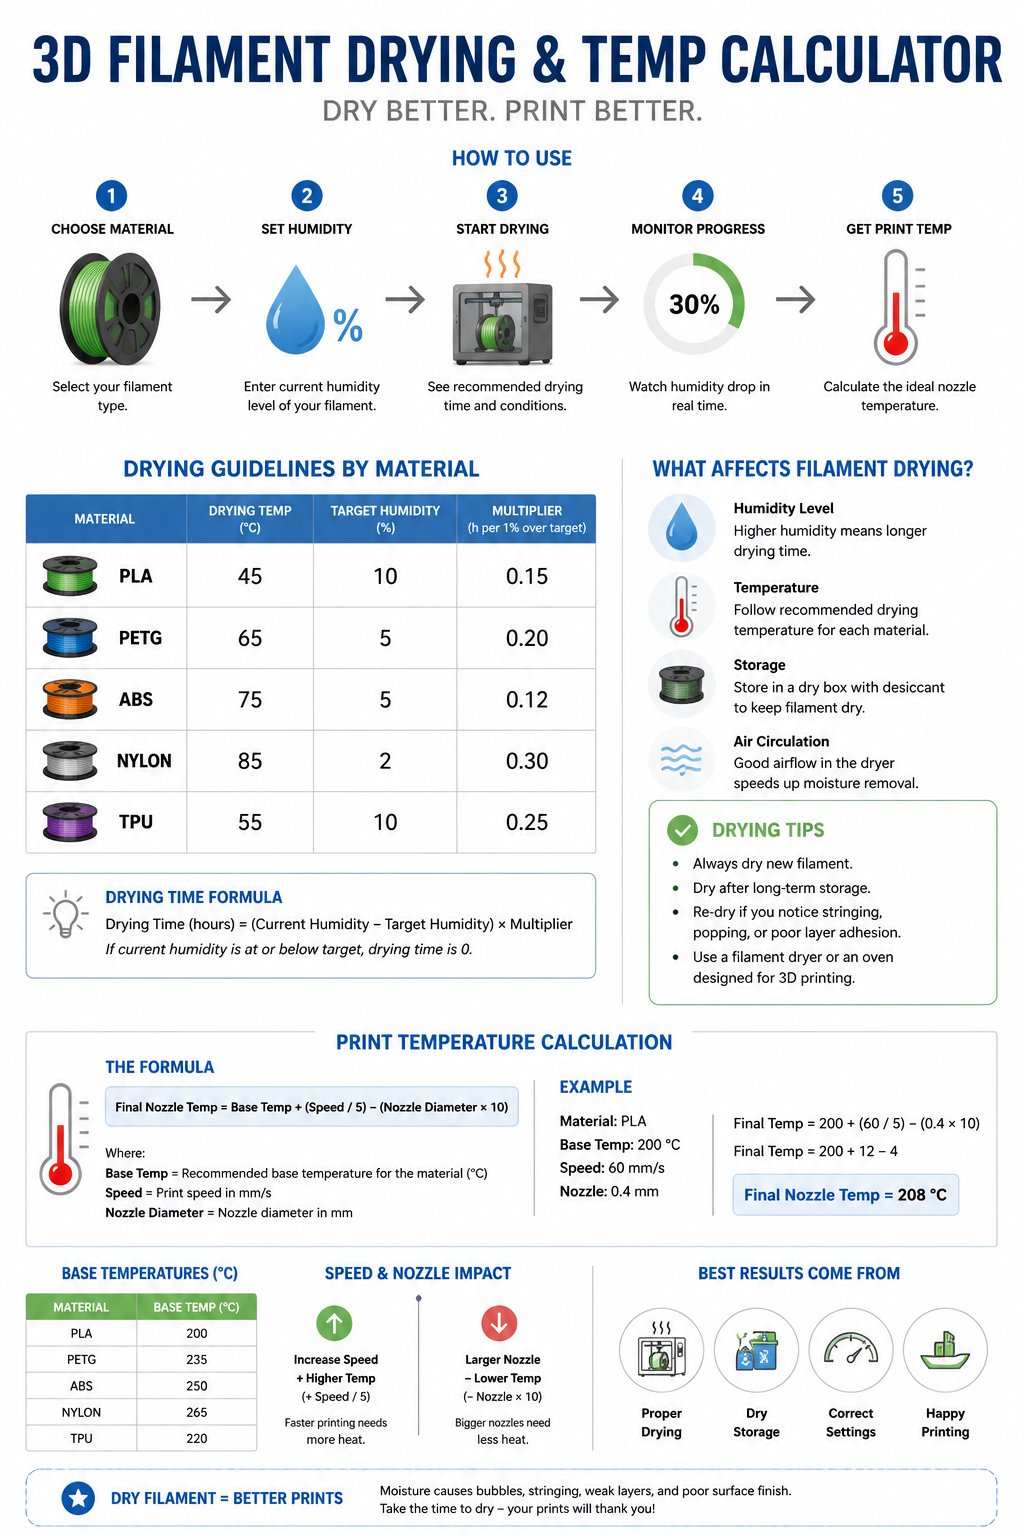
The calculator is built around a very clear workflow. First, the user picks the material. Then the humidity level of the filament is entered. After that, the tool shows the drying target and a drying time estimate. On the print side, it uses nozzle size and print speed to give a final temperature suggestion. That means one page can cover both preparation and printing setup in a way that feels quick and practical.
Table of Contents
What the calculator is meant to do
The main job of the calculator is to turn a few simple inputs into a cleaner printing plan. It answers questions that come up all the time:
- How wet is the filament right now?
- How dry does it need to be for the chosen material?
- How long should it stay in the dryer?
- What base temperature makes sense for the filament type?
- How should temperature shift when speed or nozzle size changes?
That makes the tool useful both before a print and while adjusting a printer for a specific job. It is especially handy when switching between materials. PLA and PETG often tolerate easy settings, while Nylon and TPU usually need more care. The calculator keeps those differences visible without forcing the user to memorize a bunch of numbers.
How to use it step by step
The usage flow is simple. Start with the drying tab. Pick the filament material. Enter the current moisture percentage. The calculator will show the dryer temperature, target humidity, and approximate drying time. If the filament is already dry enough, it will say so directly. Then move to the print temperature tab. Select the nozzle size, set the print speed, and read the suggested nozzle temperature. The result updates instantly, so there is no need to press through extra menus or chase hidden settings.
The material buttons are the main starting point. PLA, PETG, ABS, Nylon, and TPU each behave differently, so the calculator uses a different drying target and temperature baseline for each one. That is useful because not all filament behaves the same way in storage or during printing. A setting that works for PLA can be too low for Nylon or too high for TPU. The calculator keeps that difference front and center.
The moisture slider is also practical. A user does not need a lab-grade reading to get value from the tool. If the spool looks damp, feels questionable, or has been sitting open for a while, the user can enter a rough estimate and still get a useful drying plan. That is exactly the kind of everyday decision this tool is built for.

Quick reference for the main controls
| Control | What to enter | Why it matters | What changes on screen |
|---|---|---|---|
| Material | PLA, PETG, ABS, Nylon, TPU | Sets the baseline drying and print temp behavior | Dry temperature, target humidity, and nozzle temp all update |
| Humidity | Current filament moisture % | Determines whether drying is needed and how long it may take | Drying time estimate changes |
| Nozzle size | 0.2, 0.4, 0.6, 0.8, 1.0 | Helps adjust final nozzle temperature | Temperature correction changes |
| Print speed | Speed in mm/s | Faster printing often needs hotter extrusion | Final nozzle temperature shifts up or down |
| Drying mode | Start drying | Moves the simulation forward | Moisture and time countdown update visually |
Material guide
Each material behaves in its own way. That is why the calculator gives each one its own drying temperature, target humidity, and base print temperature. PLA is usually the easiest to handle. PETG needs a bit more attention because moisture can make it stringy and messy. ABS is more sensitive to stable temperature behavior. Nylon is the most demanding in many cases because it absorbs moisture quickly and can become noisy or weak if it is not dried well. TPU also benefits from controlled moisture because flexible filament can turn inconsistent very fast when damp.
👉 The drying target shown by the calculator is meant to be a practical goal, not a lab purity number. For users, that is important. Most of the time the real aim is not perfect dryness. The real aim is enough dryness for stable extrusion and a cleaner result on the part. That is why the tool uses simple targets and simple time estimates rather than trying to act like a chemistry report.
| Material | Drying temp | Target humidity | Base nozzle temp | Typical behavior when wet |
|---|---|---|---|---|
| PLA | 50 °C | 12 % | 205 °C | Minor stringing, dull finish, small bubbles |
| PETG | 65 °C | 7 % | 240 °C | Heavy strings, rough surface, unstable bridges |
| ABS | 75 °C | 7 % | 250 °C | Sputtering, weak layers, inconsistent flow |
| Nylon | 85 °C | 3 % | 265 °C | Very noisy extrusion, weak parts, severe moisture effects |
| TPU | 55 °C | 12 % | 225 °C | Unsteady feeding, poor surface quality, stringing |
Simple formulas used by the calculator
The formulas are intentionally easy to read. They are not there to overload the user. They are there to show the logic behind the result. In simple form, the drying time estimate works like this:
Drying time in hours = current humidity minus target humidity × material multiplier
If the current humidity is already lower than the target, drying time becomes 0 and the calculator can show that the filament is already dry enough for the chosen material. That is a nice feature because it avoids sending the user on a pointless drying cycle.
The temperature side is just as direct:
Final nozzle temperature = base temperature + speed correction – nozzle correction
Speed correction = print speed ÷ 5
Nozzle correction = nozzle size × 10
That structure gives a practical estimate, not an absolute law. It is meant to help users land in a reasonable range without manually checking every combination of speed and nozzle diameter. Faster printing usually needs more heat. A larger nozzle can also change how the material behaves in the hot end. The calculator folds those ideas into one quick answer.
How to read the drying result
The drying table gives three main pieces of information. The dryer temperature shows the heat level associated with the selected filament. The target humidity shows the dryness goal for that material. The drying time gives a rough estimate based on the current moisture level and the selected material’s sensitivity.
That time is best treated as a useful estimate, not a stopwatch. A real spool can dry faster or slower depending on how wet it was, how the dryer distributes heat, how tightly the filament is wound, and how long it has been exposed to room air. Still, the estimate is good enough for planning. It helps users decide whether a short drying session is enough or whether the spool needs a longer cycle before printing.
When the calculator says the filament is already dry, that is a very practical signal. It means the current humidity is already at or below the target shown for that material. In that case, the user can move straight to printing temperature setup instead of wasting time on unnecessary drying.
How to read the print temperature result
The print temperature section is designed to give a final nozzle temperature, not just a generic material number. That matters because print speed and nozzle size both affect how the hot end behaves. Faster prints often need a bit more heat so the plastic can keep moving smoothly. Nozzle size can also shift the behavior because a larger opening changes flow and melt demand.
The calculator splits this into a clean formula so the user can understand the result quickly. The base temperature comes from the selected material. Then the speed correction nudges it upward when speed is higher. The nozzle correction reduces the value slightly based on nozzle diameter. The end result is a practical setpoint that is easy to use in a slicer or printer profile.
For most users, the biggest value here is speed. It is very common to change print speed without thinking about temperature. That can cause weak layers or poor extrusion. The calculator gives a quick reminder that speed and temperature are tied together. That alone can save a lot of trial and error.
| Input | What it affects | Why it matters | Common user mistake |
|---|---|---|---|
| Humidity | Drying time | Wet filament needs longer drying | Entering a guess without checking the spool condition |
| Material | All drying and temp values | Different plastics behave differently | Using the same setting for every filament type |
| Nozzle size | Final nozzle temperature | Flow changes with nozzle diameter | Ignoring nozzle size after swapping hardware |
| Print speed | Final nozzle temperature | Faster motion often needs more heat | Raising speed without checking temperature |
| Start Drying | Simulation progress | Helps visualize drying completion | Expecting it to change the real spool outside the calculator |
What the 3D view adds
The 3D scene is not just decoration. It gives the page a fast visual cue that ties the controls together. Users can see the spool, the dryer body, and the temperature state in one place. That makes the experience easier to understand than a plain form with numbers only. It also helps users confirm that they are working in the drying section rather than the print-temperature section.
The lighter colors make the model easier to read at a glance. A too-dark spool or dryer can hide detail and make the page feel heavy. A brighter visual design improves clarity without changing the calculation logic. That matters because the page should look like a useful tool, not a black box.
The 3D animation also gives useful feedback during drying. The particles and timer help the user understand that the simulation is moving forward. That does not replace the numbers, but it makes the page feel more alive and easier to track during use.
Practical ways to use the calculator
There are a few common situations where this tool is especially useful. One is when a spool has been sitting open for days or weeks. Another is when a print is failing with stringing, pops, or rough layers and moisture is the likely cause. It is also useful when switching from an easy filament like PLA to a more demanding one like Nylon. The calculator helps the user avoid treating every spool the same.
Another strong use case is print profile setup. A user may already know the machine and slicer, but still need a quick temperature reference after changing nozzle size or print speed. The calculator makes that adjustment easier. Instead of rethinking the whole profile from scratch, the user can just check the values and continue.
It also helps newer users get started. Many beginners only know that filament “should be dry” or that “temperature matters.” That is true, but it is too vague to act on. This kind of calculator turns that vague advice into something concrete and usable. A person can see a temperature number, a moisture target, and a drying estimate right away.
Common mistakes to avoid
One common mistake is treating the drying target as a magic number. It is not magic. It is a useful goal for a specific material in a practical workflow. Another mistake is changing speed a lot without checking temperature. That can cause weak prints even when the material is dry. A third mistake is using a wet spool and assuming the problem is only in the slicer. Sometimes the real issue is just moisture.
It is also easy to forget that nozzle size matters. A printer that behaves well with a 0.4 nozzle may need a different nozzle temperature when moved to 0.8 or 1.0. The calculator makes that easier to manage. It does not guarantee perfection, but it does reduce blind guessing.
Another useful habit is to compare results between materials. PLA may look fine at one speed and temperature, while PETG or TPU may need a different balance. The calculator makes those differences visible. That helps users build better intuition without memorizing a separate rulebook for each filament.
When to trust the result and when to treat it as a starting point
The calculator is best used as a strong starting point. For everyday printing, that is often enough. It gives reasonable drying guidance and a practical print-temperature estimate. For unusual setups, though, the result should be treated as a baseline. Very fast printers, special hot ends, nonstandard nozzles, or unusual filament brands may need a bit of tuning after the first test print.
That does not make the tool less useful. In fact, it makes it more realistic. Most experienced users do not expect one number to solve everything. They expect a smart starting point that cuts down on wasted time. That is exactly what this calculator does.
For users who print often, the page can become a fast daily reference. For users who print only now and then, it can be a safety check before starting a job. In both cases, the value is the same: less guesswork, less wasted filament, and a better chance of a clean first print.
Reference formulas and field notes
| Item | Simple form | Meaning | Why it helps |
|---|---|---|---|
| Drying time | current humidity – target humidity × multiplier | Estimate of drying hours | Helps plan the drying cycle |
| Speed correction | speed ÷ 5 | Extra heat from faster printing | Keeps extrusion more stable |
| Nozzle correction | nozzle × 10 | Small adjustment from nozzle size | Helps align temperature to flow demand |
| Final nozzle temp | base temperature + speed correction – nozzle correction | Suggested print temperature | Combines the main variables into one number |
These formulas are intentionally compact because the page is meant for practical use. Users do not need to stare at a wall of math to get value from the calculator. They only need enough structure to understand why the numbers change when the material, speed, or nozzle size changes.
Why this tool is useful on a real workflow page
A good printing tool should do 3 things well: show relevant data quickly, make the controls easy to understand, and avoid clutter. This calculator follows that idea. The drying and temperature tasks are closely related, so putting them on one page makes sense. The 3D view gives an immediate visual identity. The tables give quick reference numbers. The inputs are simple enough to use in seconds.
That combination is especially useful for shops, hobby benches, and production desks where speed matters. Nobody wants to bounce between a separate dryer chart, a material temp note, and a printer profile every time a spool changes. This page keeps the useful parts in one place.
For a 3D printing workflow, that is the main win. It turns a set of annoying little decisions into a short, readable process. Pick the filament. Check the moisture. Read the dryer target. Check the print temperature. Start the job with less uncertainty. That is what a practical calculator should do.
Suggested reading
- Charles A. Harper, Handbook of Plastics, Elastomers, and Composites
- Dominick V. Rosato and Donald V. Rosato, Plastics Engineering, Manufacturing, and Data Handbook
- Chris Oxlade, 3D Printing
- Ben Redwood, File Montero, and Brian Choi, The 3D Printing Handbook
- Glen J. Su and others, Materials and Processes for 3D Printing
- David D. C. C. and technical editors, Polymer Processing and Material Behavior

David Parry — Senior Engineering Analyst
Specializing in electronics and physics-based simulations with 20+ years of engineering experience. David ensures the mathematical and physical accuracy of the tools at ProCalcLab.