
An equilateral quadrilateral, commonly known as a rhombus or a diamond shape, is a fundamental geometry style used across various professional industries. You see it constantly in hardwood floor layouts, brick patio pavers, chain-link security fences, and architectural trusses. Unlike a standard square, a rhombus introduces dynamic angles that can completely change the visual appeal or structural integrity of a project. However, these slanted lines make manual planning tricky. A minor calculation mistake can lead to misaligned tiles, structural gaps, or excessive material waste. This interactive tool provides a highly visual, mistake-free solution by calculating every crucial dimension instantly with real-time two-dimensional and three-dimensional rendering.


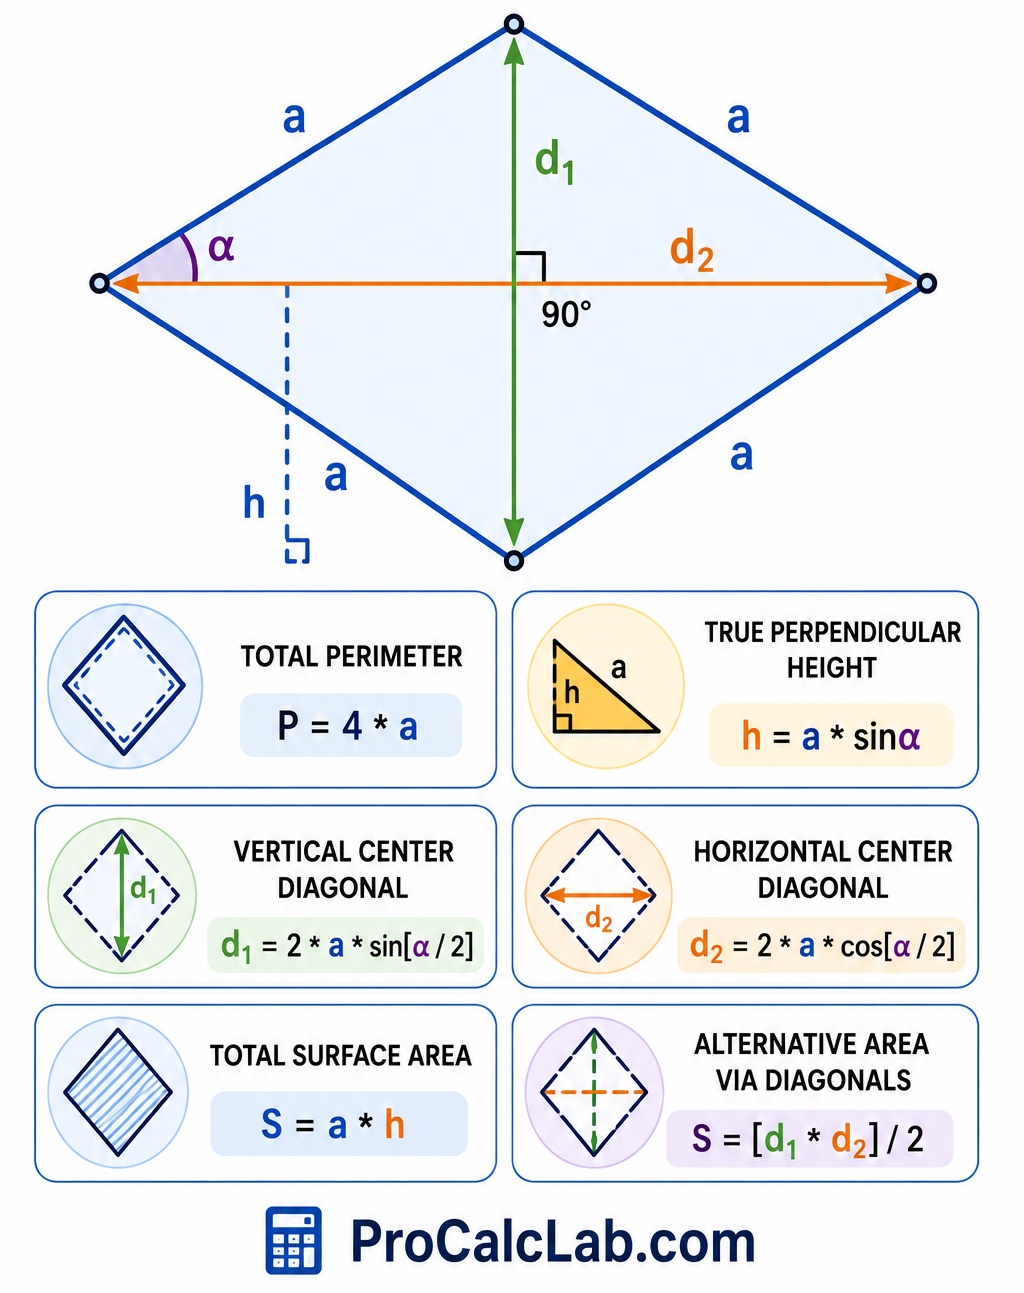
Table of Contents
Understanding the Calculator Interface
The workspace is split into distinct functional zones to give a clear view of the shape from every angle. At the top, a three-dimensional preview shows the physical volume and spatial orientation of the object. Directly below the 3D canvas, a series of adjustment bars and number fields let you input specific values. Further down, a clean data table displays the exact mathematical results. Finally, a traditional flat blueprint drawing sits at the bottom to verify layout lines before making any physical cuts.
How to Input Measurements
The tool stands out because it allows for multiple starting points. Because a rhombus is perfectly symmetrical with four equal sides, modifying one parameter automatically recalculates all the others to preserve the geometric laws of the shape. Adjustments can be made by moving the horizontal sliders left or right for quick approximations, or by typing exact numbers directly into the input fields for maximum precision.
- Side a: This controls the length of all four outer borders. Increasing or decreasing this value scales the entire diamond uniformly.
- Angle α: This defines the primary corner slant. Setting this value close to 90 degrees transforms the shape into a perfect square. Moving it toward lower values creates a sharper, more elongated diamond.
- Diagonal d1: The vertical distance across the center, connecting the top and bottom sharp points.
- Diagonal d2: The horizontal distance across the center, connecting the left and right wide corners.
- Height h: The straight, perpendicular distance between the top and bottom parallel boundary lines. This is never the same as the slanted side length unless the shape is a square.
Interpreting the 3D and 2D Visual Aids
The upper 3D viewport renders the rhombus as a thick solid piece with a transparent blue face and dark blue reinforcing borders. You can click and drag directly inside this window to rotate the model, tilt it, or view it from a bird-eye perspective. This helps understand how the shape occupies space in a real-world setting. The lower 2D canvas acts as a precise workbench drafting layout. It draws the shape flat, highlights the intersection of the two main diagonals with dashed lines, and prints the exact angle degree directly inside the corner vertex.
Practical Construction Example
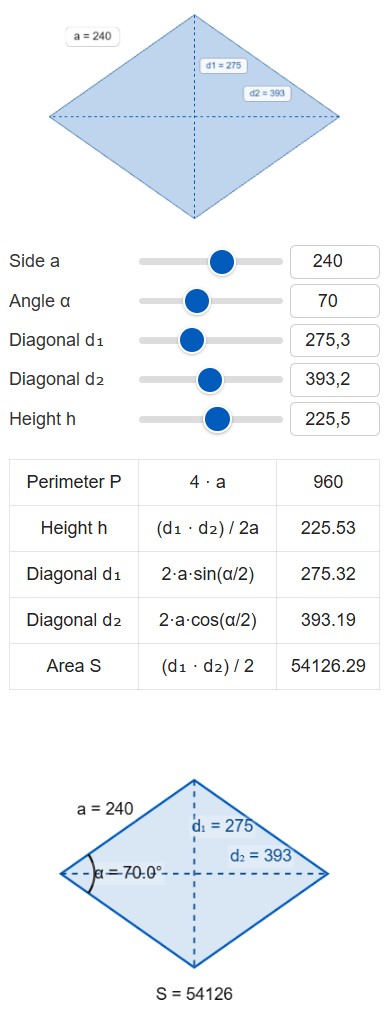
♦ Let us look at a practical situation where an installer is setting up a diamond-pattern stone accent in the middle of a concrete driveway. The design plan specifies that each diamond block side must measure exactly 240 inches. To create the desired geometric look, the primary installation angle needs to be set at 70 degrees.
To plan the layout, you enter the following values into the system:
- Side a: 240 inches
- Angle α: 70 degrees
The calculator instantly processes the data and populates the remaining measurements. The perimeter requires 960 linear inches of border material. The vertical distance across the sharp points, diagonal d1, is 275.3 inches. The wide horizontal span across the center, diagonal d2, measures 393.2 inches. The true working height between the parallel rows is 225.5 inches.
📝 The total interior coverage area reaches exactly 54120 square inches. To find out how many square feet of stone to order, divide that total area by 144. This results in approximately 376 square feet of pavers. Having the exact diagonal lengths allows the crew to pull tape measures from opposite corners across the driveway, ensuring the installation stays perfectly square and square-edged without leaning out of alignment as work progresses.
Essential Rhombus Formulas for Field Reference
Manual verification on the job site provides peace of mind. The geometry of a diamond relies heavily on right-triangle trigonometry because the two inner diagonals always cross at a perfect 90-degree angle, splitting the shape into four identical right triangles. The fundamental formulas below use clean plain text formatting for quick reading.
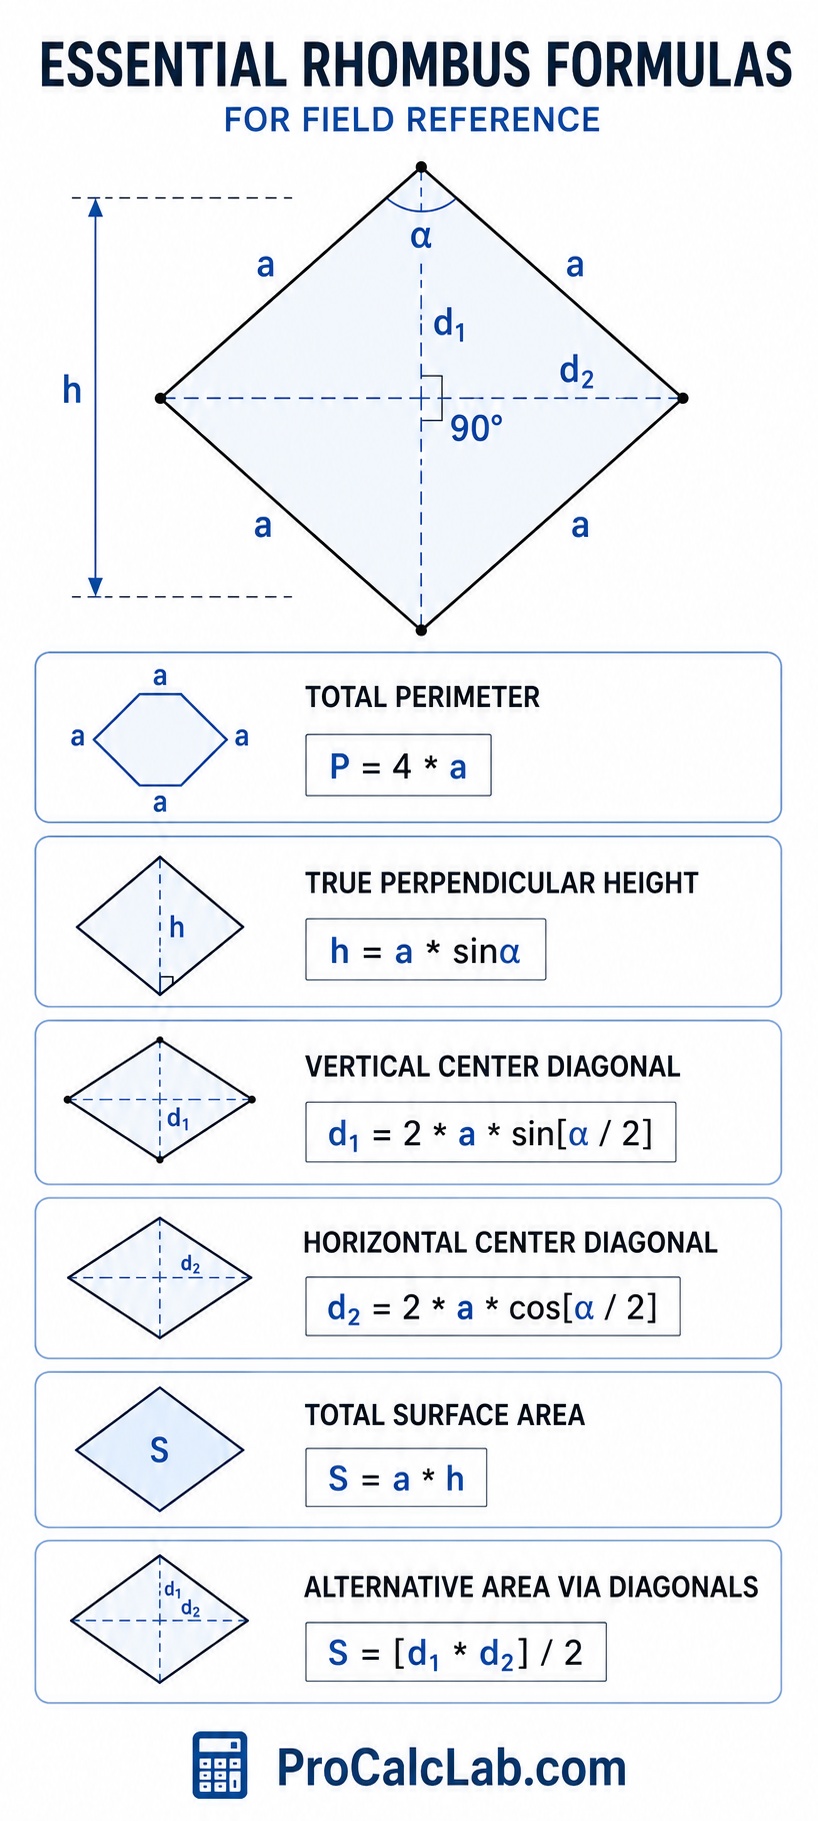
Total Perimeter:
P = 4 * a
True Perpendicular Height:
h = a * sinα
Vertical Center Diagonal:
d1 = 2 * a * sin[α / 2]
Horizontal Center Diagonal:
d2 = 2 * a * cos[α / 2]
Total Surface Area:
S = a * h
Alternative Area via Diagonals:
S = [d1 * d2] / 2
Comprehensive Reference Tables for Trade Layouts
Different layout patterns require distinct angle combinations to achieve specific visual appearances. These look-up tables serve as a quick guide for architectural drafting and material estimating.
Table 1: Standard Visual Patterns and Corner Slants
This table details how shifting the main corner angle modifies the ratio between the center lines, which dictates the overall design style of the diamond pattern.
| Design Style | Corner Angle α | Diagonal Ratio |
|---|---|---|
| Perfect Square Block | 90.0° | 1.00 |
| Classic Heritage Diamond | 80.0° | 1.19 |
| Standard Flooring Chevron | 70.0° | 1.42 |
| Sharp Modern Accent | 60.0° | 1.73 |
| Elongated Argyle Pattern | 50.0° | 2.14 |
| Linear Harlequin Trim | 45.0° | 2.41 |
| Narrow Border Accent | 40.0° | 2.74 |
| Slim Decorative Paving | 30.0° | 3.73 |
| Ultra Sharp Mosaic Element | 20.0° | 5.67 |
| Extreme Linear Boundary | 10.0° | 11.43 |
Table 2: Common Structural and Tile Allocations
These values represent standard pre-calculated layouts for architectural features based on uniform incremental side lengths to minimize custom cutting at the job site borders.
| Project Type | Side Length a | Angle α | Total Area |
|---|---|---|---|
| Small Mosaic Inlay | 12 in | 60° | 125 sq in |
| Standard Floor Tile | 24 in | 75° | 556 sq in |
| Decorative Patio Paver | 36 in | 65° | 1174 sq in |
| Medium Garden Feature | 60 in | 80° | 3545 sq in |
| Large Ceiling Medallion | 96 in | 70° | 8660 sq in |
| Courtyard Centerpiece | 120 in | 60° | 12471 sq in |
| Driveway Framing Grid | 180 in | 75° | 31295 sq in |
| Structural Roof Truss Segment | 240 in | 55° | 47183 sq in |
| Commercial Plaza Layout | 300 in | 70° | 84572 sq in |
| Grand Exhibition Floor Piece | 400 in | 60° | 138564 sq in |
Table 3: Material Overage and Waste Estimators
When cutting square pieces of lumber, stone, or tile into diamond shapes, scrap material is inevitable. Steeper slants create more waste along the perimeter edges. Use these multipliers to adjust your total order quantity.
| Working Angle α | Perimeter Complexity | Recommended Waste Factor |
|---|---|---|
| 85° – 90° | Low Complexity | 1.05 |
| 75° – 84° | Minor Corner Trim | 1.08 |
| 65° – 74° | Standard Diagonal Angle | 1.12 |
| 55° – 64° | Moderate Scrap Generation | 1.15 |
| 45° – 54° | High Cut Volume | 1.22 |
| 35° – 44° | Significant Edge Offcuts | 1.30 |
| 25° – 34° | Severe Angle Scrap | 1.45 |
| 15° – 24° | Extreme Material Loss | 1.65 |
| 10° – 14° | Maximum Custom Fitting | 1.90 |
Utility Functions for Workflow Efficiency
The interface includes two vital buttons to streamline field operations. The Reset function instantly clears all custom modifications, returning the system to a clean default baseline of a 240-unit side length at a 70-degree angle. This allows you to start over with a fresh blueprint without manually overriding every single input track.
The Download tool serves as a digital camera for your current calculation box. Clicking it captures the entire current layout state, freezing the 3D model orientation, the line drawings, and the numeric results table into a single high-definition PNG image file. This image immediately saves to your device storage. Builders can print this file out to pass to the framing crew, save it as a digital submittal for client review, or attach it directly to structural material estimates.
Advanced Geometry: Handling Extreme Dimensions
The calculator accommodates extreme parameters safely. For instance, if you push the slider to a narrow angle like 15 degrees, the shape becomes incredibly thin and resembles a flat spearhead. In this scenario, diagonal d1 shrinks dramatically while diagonal d2 stretches close to its absolute mathematical limit. Conversely, pushing the input toward 160 degrees flattens the shape vertically, swapping the roles of the two center lines. The underlying canvas dynamically rescales its internal grid system to ensure the line illustration never clips off the screen borders, keeping the entire shape visible and measurable regardless of how distorted the inputs become.
Bibliography and Informational Resources
- Harris, C. M. Dictionary of Architecture and Construction. 4th Edition. McGraw-Hill Education, 2005.
- Chudley, R., Greeno, R. Building Construction Handbook. 11th Edition. Routledge, 2016.
- Prosise, C. B. Complete Guide to Residential Carpentry. Prentice Hall, 2011.
- Spence, W. P. Woodworking: The Complete Step-by-Step Manual. Sterling Publishing, 2008.
- Thomas, G. B., Weir, M. D. Thomas’ Calculus: Early Transcendentals. 13th Edition. Pearson, 2014.

Markus Fletcher — Structural Design Specialist
Expert in structural integrity, 3D modeling, and applied mathematics. Markus focuses on creating precise tools for construction professionals and DIY engineers.


